
The Instax Mini 11 camera is designed to automatically detect when the flash should be used, depending on the ambient light conditions. If the camera detects low light conditions, it activates the flash by default. Turning off the flash manually cancels this automatic function.
When may I need to turn off the flash on the Instax Mini 11?
There are various situations where you may need or want to turn off the flash on your Instax Mini 11 camera. Here are a few examples:
- Well-lit rooms: In bright light, such as outdoors on a sunny day or in a well-lit room, the flash may not be needed to properly expose photos. Disabling the flash will help you avoid overexposure and get more natural-looking photos;
- Creative Lighting: If you are experimenting with different lighting techniques or trying to achieve a certain mood or effect in your photos, turning off the flash will allow you to rely solely on the available light sources. This can lead to more dramatic lighting, interesting shadows, or unique compositions;
- Close-up or macro shots: When taking close-ups or macro shots, the Instax Mini 11 camera flash can sometimes be too sharp, causing overexposure or blurring of details. In such cases, turning off the flash can help you take more detailed and balanced close-up shots;
- Low-light shooting: Although the Instax Mini 11 is designed to automatically activate the flash in low-light conditions, there are times when you prefer to work with available ambient light or use alternative lighting methods.
How to Turn Off Flash on Polaroid?

To disable the flash on your Polaroid camera, the specific steps may vary depending on the model you have. However, I can provide you with some general instructions to help you disable the flash. Here’s how you can disable the flash on your Polaroid camera:
- Turn the camera on: Turn on your Polaroid camera by pressing the power button. The location of the power button may vary depending on the camera model. If you do not know the exact location of the button, refer to your camera manual;
- Access the setup menu: Locate the button or menu option that allows you to access the camera settings. These are usually labeled “Menu” or “Settings.” Again, the location may vary depending on the camera model. Refer to your camera’s instruction manual if necessary;
- Navigate to the flash settings: Once in the camera setup menu, use the arrow buttons or the navigation dial (if available) to scroll through the options. Locate the submenu or option associated with the flash settings. It may be labeled “Flash,” “Flash Mode,” or something similar;
- Select an option to turn the flash off: Once you have found the flash settings, select an option to turn the flash off. Depending on your camera, you may have to cycle through the different flash modes until you find the “Off” or “Disable” option. Use the arrow buttons or the navigation dial to make your selection;
- Save Settings: After selecting the Flash Off option, navigate to the Save or Apply option in the setup menu. Press the appropriate button to save changes and exit the settings menu;
- Test the camera: To ensure that the flash is off, take a test shot in a well-lit area. The camera should take the picture without using the flash.
This will turn off the automatic flash and allow you to take photos without additional lighting. Remember that if you are in a low-light environment, your photos without the flash may turn out blurry or dark, so it is important to experiment with different lighting conditions and camera settings to find the best combination for your needs.
What is the permanent flash on the Instax Mini 11?
The Instax Mini 11 does not have a continuous flash mode. It is designed to automatically determine whether to use a flash depending on the lighting conditions when taking pictures.
The camera is equipped with Auto Exposure Control, which evaluates ambient light and adjusts shutter speed and flash output accordingly. It uses the built-in light sensor to determine the brightness of the scene and decides whether to activate the flash.
This auto-flash function helps simplify the shooting process by allowing you to focus on framing your shot while the camera makes the necessary adjustments for optimal exposure.
How to turn off the flash on Instax Mini 11 – step-by-step instructions
To turn off the flash on the Instax Mini 11, follow these steps:
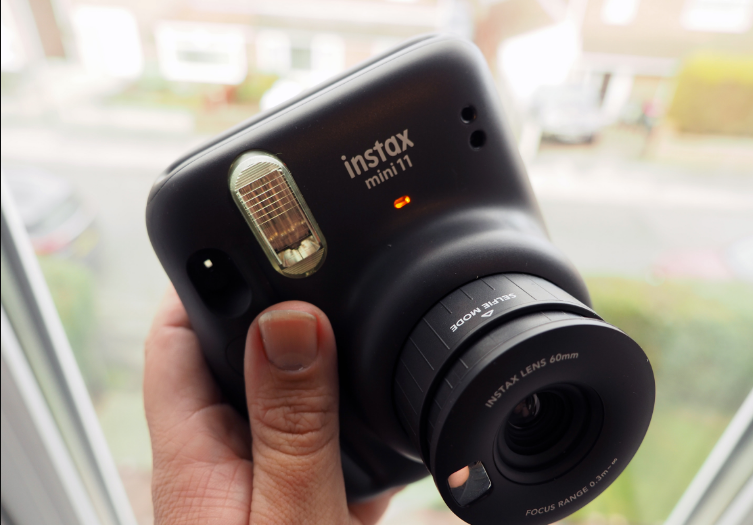
- Turn the camera on by pressing the power button located on the lens barrel;
- Check the indicators next to the power button. If the light is orange, it means the camera is ready to shoot;
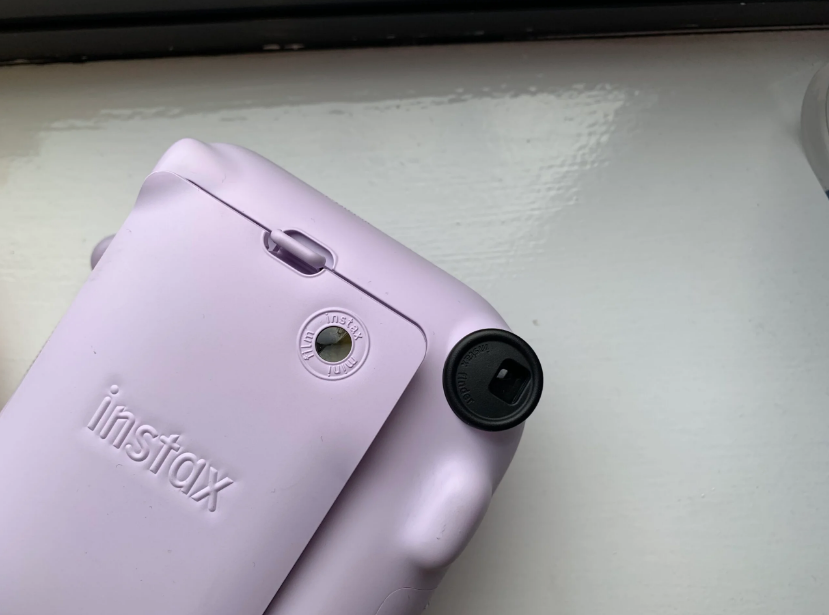
- Locate the Flash button on the back of the camera. It is located on the left side of the lens;
- Press and hold the flash button until the light changes from orange to red. This means that the flash is off.
Once the flash is off, you can start taking pictures without the flash. Keep in mind that without the flash, the camera may perform better in well-lit conditions, and in dark conditions, you may need to change settings or use additional lighting.
Remember to check the lights periodically to make sure that the flash is still off. If you want to turn the flash back on, just press and hold the flash button until the light turns orange again.
Why a permanent flash reduces the risk of Mini 11 underexposed photos?
Having a permanent flash on your Instax Mini 11 camera reduces the risk of underexposed photos in certain situations. The purpose of the flash is to provide extra light when ambient light conditions aren’t adequate for proper exposure. Here’s how a constant flash can help reduce the risk of underexposed photos:
- In low-light conditions: In low-light or low-light conditions, the camera light sensor may determine that the available light is not sufficient to properly expose the photograph. In such cases, a constant flash can provide the necessary light to illuminate the scene and produce a well-exposed photo;
- Backlit subjects: When the subject is placed in front of a bright light source, such as a window or the sun, this can cause the subject to appear dark or silhouetted in the photograph. The continuous flash can help balance the exposure by filling the subject with light, preventing underexposure;
- Close-up photography: In close-up or macro photography, where the subject is often in close proximity to the camera, natural light hitting the subject may be lacking. Constant flash can help provide additional light and prevent underexposure, ensuring that details of the subject are captured correctly;
- Shooting indoors: When shooting indoors, especially in rooms with limited natural light, a constant flash can compensate for the lack of light and prevent underexposure. It helps illuminate the scene and subjects evenly, resulting in well-exposed photos.
By having a permanent flash that automatically activates when needed, the Instax Mini 11 helps reduce the risk of underexposure in a variety of challenging lighting conditions. It ensures that your photos are sufficiently illuminated, resulting in improved overall image quality and detail.
How to make overexposure of the Instax Mini 11?
To intentionally create an overexposure effect with the Instax Mini 11, follow these steps:
- Check lighting conditions: Select a scene or subject that is well-lit or has bright light sources. Overexposure occurs when too much light hits the film, so having bright lighting is important;
- Turn the camera on: Turn on the Instax Mini 11 by pressing the power button located on the lens barrel;
- Take a picture: Look through the viewfinder and compose your desired picture. Remember that overexposure will affect the entire frame, so choose your subject and background accordingly;
- Cover the light sensor: The Instax Mini 11 has a built-in light sensor that helps you determine the appropriate exposure. To intentionally create overexposure, you need to lock this sensor;
- Find the light sensor: The light sensor on the Instax Mini 11 is usually located on the front of the camera, near the lens. It may look like a small round window;
- Close the light sensor: Use your finger or an object (such as tape or your hand) to close the light sensor completely. Make sure that no light can penetrate the sensor;
- Take the picture: Press the shutter button to take the picture without covering the light sensor. The camera will not measure light correctly, resulting in an overexposed image;
- Remove the cover: After taking a picture, remove your finger or an object from the light sensor. This will allow the camera to resume normal exposure calculations for subsequent shots.
Remember that overexposure can result in blurred highlights, loss of detail, and blurry-looking photos. This is a creative technique that allows for unique artistic effects, but it may not be suitable for all subjects or subjects. Experimenting with different lighting conditions and subjects can help you achieve the desired overexposure effect with the Instax Mini 11.
Why is the light on my Instax Mini 11 blinking?
If the light on your Instax Mini 11 camera is blinking, it usually indicates a problem or a specific condition that needs attention. Here are a few possible reasons why the light on your Instax Mini 11 camera may be blinking:
- The flash is charging;
- Low battery;
- Film meter warning.
It is important to refer to your Instax Mini 11 model owner’s manual for details on the flashing indicators and their respective values. In the manual, you will find accurate instructions and troubleshooting steps to effectively resolve the problem.
If you cannot solve the flashing light problem yourself, we recommend that you contact Fujifilm Support or take your camera to an authorized service center for assistance and further diagnosis.
Conclusions
This method allows you to quickly turn off the flash without accessing the menus or settings. However, the next time the camera is turned on, the flash will automatically turn on. So if you want to turn the flash off permanently, you will have to repeat this process every time you turn the camera on.
But don’t forget to check the indicators on the camera to make sure the flash is off before shooting in low-light conditions. Ultimately, the decision to turn off the flash on your Instax Mini 11 camera depends on the specific lighting conditions, the desired creative effect, and your personal preferences as a photographer. Experimenting with different settings and lighting scenarios can help you determine when it is appropriate to turn off the flash for your specific needs.